Post
Essential Makeup Brushes and How to Use Them Like a Pro
Jun
Essential Makeup Brushes and How to Use Them Like a Pro
Achieving a flawless makeup look isn’t just about the products you choose; it’s profoundly influenced by the tools you use to apply them. Essential makeup brushes are the unsung heroes of any beauty routine, transforming a good product into an exceptional finish. From seamless foundation to perfectly blended eyeshadow, understanding the purpose and proper technique for each brush can elevate your makeup game from amateur to artist. This comprehensive guide will walk you through the must-have brushes for every makeup kit, explain their unique functions, and teach you how to wield them like a seasoned professional.
Why the Right Brushes Matter: The Benefits of a Good Brush Set
Investing in a quality set of makeup brushes is one of the best decisions you can make for your beauty regimen. The right tools offer a multitude of benefits that far surpass using your fingers or generic applicators. Firstly, brushes provide superior blending and seamless application, ensuring your makeup looks natural and professional, rather than patchy or streaky. They allow for precise product placement, whether you’re defining your brows or creating a sharp winged liner. Secondly, brushes offer better hygiene. Using clean brushes prevents the transfer of oils, bacteria, and dead skin cells from your fingers to your face, reducing breakouts and keeping your products uncontaminated. Thirdly, they maximize product efficiency; brushes pick up and distribute just the right amount of product, preventing wastage and helping your expensive makeup last longer. Finally, good brushes offer control and versatility, enabling you to layer, build, and sculpt your features with ease, empowering you to experiment with different looks and techniques with confidence.
The Anatomy of a Makeup Brush: Understanding Their Design
Before diving into specific brush types, it’s helpful to understand the basic components that make up any makeup brush. Each part plays a crucial role in its performance. The bristles are arguably the most important element, as they directly interact with your makeup and skin. They can be natural (animal hair) or synthetic (man-made fibers), each offering distinct advantages for different product types. The ferrule is the metal band that connects the bristles to the handle. A sturdy, well-crimped ferrule prevents shedding and ensures the brush maintains its shape over time. Finally, the handle, typically made of wood, plastic, or acrylic, provides the grip and balance needed for comfortable and controlled application. Understanding these elements helps you appreciate the design behind each brush and how it contributes to its unique function.
Essential Makeup Brushes and How to Wield Them Like a Pro
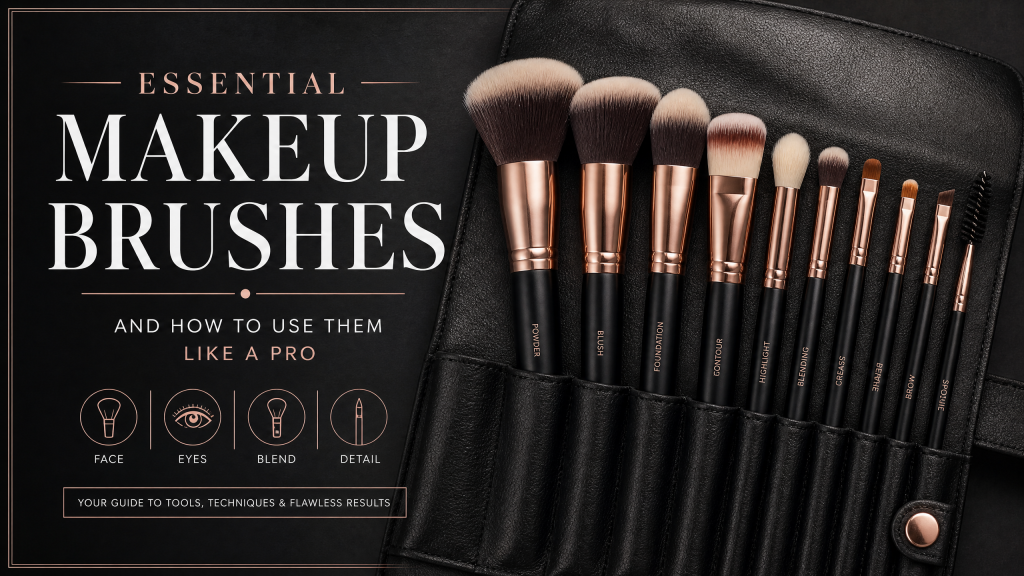
Building a versatile brush collection is key to mastering any makeup look. Here’s a breakdown of the essential brushes every makeup enthusiast should consider, along with practical tips on how to use them effectively.
Face Brushes
- Foundation Brush (Flat, Buffing, or Stippling): For a streak-free base. A flat brush is ideal for full coverage, painting foundation onto the skin. A buffing brush (dense, flat-top or rounded) is perfect for blending liquid or cream foundations into the skin with circular motions for an airbrushed finish. A stippling brush (duo-fibre with short dense bristles and longer sparse ones) is excellent for a lighter, more natural finish, applying product with a dotting motion.
- Concealer Brush: A small, flat, tapered brush perfect for precise application of liquid or cream concealer. Use gentle patting motions to apply product directly onto blemishes, dark circles, or areas needing extra coverage, then lightly feather out the edges for a seamless blend with your foundation.
- Powder Brush: Large, fluffy, and soft, this brush is designed to lightly dust setting powder over your face to set your makeup and reduce shine. Swirl it gently into loose or pressed powder, tap off excess, and sweep or lightly press it across your face, focusing on the T-zone.
- Blush Brush: Typically soft, rounded, and medium-sized, this brush is ideal for applying powder blush. Swirl it onto the apples of your cheeks and blend upwards towards your temples for a natural flush of color. Its shape ensures a diffused, soft application, preventing harsh lines.
- Bronzer/Contour Brush: This can vary from an angled brush for precise contouring to a large, fluffy dome brush for bronzing. For contour, use an angled brush to apply product in the hollows of your cheeks, along your jawline, and temples. For bronzer, use a larger, softer brush to sweep color onto areas the sun naturally hits (forehead, cheekbones, nose).
- Highlight Brush (Fan or Tapered): A fan brush offers a very light, diffused application of highlighter, while a small, tapered brush allows for more precise placement. Apply highlighter to the high points of your face: cheekbones, bridge of the nose, cupid’s bow, and brow bone, using gentle sweeping motions.
Eye Brushes
- Eyeshadow Lid Brush: A flat, dense brush designed to pack eyeshadow onto the eyelid for intense color payoff. Gently press or pat your chosen shadow onto the lid, building up color as desired. Its firm bristles ensure minimal fallout and maximum pigment transfer.
- Crease/Blender Brush: Fluffy and tapered or dome-shaped, this brush is crucial for blending eyeshadows seamlessly into the crease of your eye. Use soft, back-and-forth “windshield wiper” motions or small circular buffs to diffuse harsh lines and create a gradient effect.
- Pencil/Smudger Brush: A small, dense, bullet-shaped brush perfect for precise application of eyeshadow along the lash line or for smudging out eyeliner for a smoky effect. Use short, controlled strokes to blend out pencil or gel liners, or to intensify shadow on the outer V of the eye.
- Angled Eyeliner Brush: A thin, stiff, angled brush designed for precise application of gel, cream, or powder eyeliner. Dip the tip into your liner and use small, connected strokes to create a sharp line along your lash line, or define your brows with hair-like strokes.
- Brow Brush (Spoolie & Angled): Often dual-ended, one side features an angled brush for applying brow powders or pomades, while the other has a spoolie (mascara-like brush) for grooming brow hairs and blending product. Use the angled brush to fill in sparse areas with short, hair-like strokes, then brush through with the spoolie for a natural finish.
Lip Brushes
- Lip Brush: Small, firm, and often retractable, a lip brush offers unparalleled precision for applying lipstick or lip gloss. It allows you to define the lip line accurately and fill in color evenly, especially with darker or bolder shades, for a crisp, long-lasting finish that can be difficult to achieve directly from the bullet.
Choosing Your Perfect Brush Set: A Comprehensive Buying Guide
With countless options on the market, selecting the right makeup brushes can feel overwhelming. Here’s a guide to help you make informed decisions:
- Bristle Type: Natural vs. Synthetic: Natural hair brushes (often made from goat, squirrel, or sable hair) are excellent for powder products like eyeshadows, blush, and bronzer. Their porous texture picks up and deposits powder beautifully, creating a soft, diffused look. Synthetic brushes, typically made from nylon or Taklon, are ideal for liquid, cream, and gel products (foundation, concealer, cream blush, liquid eyeliner). Their non-porous fibers don’t absorb product, leading to a smoother, more even application and are easier to clean. Many modern synthetic brushes are incredibly soft and versatile, making them a great choice for all product types and for those with allergies or who prefer vegan options.
- Handle Material and Ergonomics: Look for handles that feel comfortable and balanced in your hand. Wood, bamboo, and plastic are common materials. The length and weight should allow for precise control without causing hand fatigue during application. A good grip is essential for stability.
- Brush Shape and Density: The shape and density dictate the brush’s function. Dense brushes (like buffing foundation brushes) provide more coverage and can blend thicker formulas. Fluffy, less dense brushes (like powder or blending eyeshadow brushes) offer a softer, more diffused application. Tapered tips are great for precision, while flat tops excel at buffing.
- Set vs. Individual Brushes: For beginners, a well-curated starter set can be a cost-effective way to acquire essential brushes. However, as you gain experience, you might prefer to purchase individual brushes to fill specific needs or replace favorites that wear out. Investing in a few high-quality individual brushes for frequently used applications can often be more beneficial than a large, low-quality set.
- Budget Considerations: Makeup brushes are available at every price point. While high-end brushes can offer superior performance and longevity, there are many excellent, affordable options from reputable brands. Read reviews, consider your needs, and prioritize quality for brushes you’ll use daily.
Practical Tips for Longevity and Performance: Cleaning and Care
Proper care of your makeup brushes is paramount not only for hygiene but also for extending their lifespan and ensuring optimal performance. Dirty brushes can harbor bacteria, lead to breakouts, and prevent your makeup from applying smoothly. Here’s how to keep them in top condition:
- Regular Cleaning: For daily users, spot cleaning after each use or every few days is highly recommended, especially for liquid foundation and concealer brushes. Use a quick-drying brush cleaner spray directly onto the bristles, then gently wipe them on a clean paper towel or cloth until no more makeup comes off. This helps remove surface product and keeps them fresh for your next application.
- Deep Cleaning: Aim to deep clean all your brushes at least once a week for face brushes and every two weeks for eye brushes. Use a gentle brush shampoo, baby shampoo, or a dedicated brush cleanser. Wet the bristles (avoiding the ferrule to prevent glue breakdown), apply cleanser, and gently swirl the brush on a textured cleaning mat or the palm of your hand until clean. Rinse thoroughly under lukewarm running water until the water runs clear.
- Drying and Storage: After cleaning, gently squeeze out excess water with a clean towel. Reshape the bristles to their original form. Lay brushes flat on a towel or hang them upside down (if you have a brush drying rack) to dry completely. This prevents water from seeping into the ferrule and loosening the glue. Never dry brushes upright in a cup. Store clean, dry brushes in a brush roll, cup, or drawer to protect them from dust and damage.
- Knowing When to Replace: Even with the best care, brushes don’t last forever. Replace brushes when bristles start shedding excessively, become frayed, lose their original shape, or feel rough against the skin. Over time, bristles can accumulate product residue that’s impossible to fully remove, impacting performance and hygiene.
Frequently Asked Questions (FAQ)
How often should I clean my makeup brushes?
Ideally, face brushes used with liquid/cream products (foundation, concealer) should be spot cleaned daily and deep cleaned weekly. Powder brushes and eye brushes can be deep cleaned every 1-2 weeks. Regular cleaning prevents bacteria buildup, product transfer, and ensures smoother application.
What’s the difference between synthetic and natural bristles?
Natural bristles are porous and excel with powder products, picking up and distributing them softly for a diffused finish. Synthetic bristles are non-porous, making them perfect for liquid, cream, and gel formulas as they don’t absorb product, leading to a more even and hygienic application. Modern synthetic brushes are also often softer and more versatile than older versions.
Can I use the same brush for different products?
While some brushes are versatile, it’s generally best to use dedicated brushes for different product types or colors, especially for eyeshadows and blush. Using the same brush for multiple colors can muddy shades, and using a brush intended for powder on liquid foundation can lead to a streaky finish or damage the brush over time. Spot clean thoroughly if you must use one brush for multiple tasks.
How do I make my makeup last longer with brushes?
Brushes help distribute product evenly and blend it seamlessly into the skin, which creates a more uniform base for longer wear. Using a setting powder brush to apply powder after liquid products, or a dense foundation brush to buff foundation into the skin, creates a smooth, locked-in finish that resists fading and creasing throughout the day.
Is an expensive brush always better?
Not necessarily. While high-end brushes often boast superior craftsmanship, bristle quality, and longevity, many affordable and mid-range brands offer excellent brushes that perform just as well. It’s more about finding brushes with the right shape, density, and bristle type for your specific needs and preferences, rather than solely relying on price. Reading reviews and trying brushes in person can help determine value.
Conclusion
Mastering the art of makeup application begins with understanding your tools. Essential makeup brushes are not just accessories; they are fundamental instruments that empower you to achieve any desired look, from a natural glow to full-glam perfection. By knowing the purpose of each brush, practicing proper application techniques, and committing to a consistent cleaning routine, you unlock the full potential of your makeup products and ensure a hygienic, professional finish every time. Embrace the power of the brush, and transform your makeup routine into an effortless, artistic endeavor. Your journey to flawless application starts now!